Guide to Setting Up an OOKLA Speedtest Server on RockyLinux 8
I'm gonna walk you through a simple guide to get your OOKLA Speedtest server(s) up and running on RockyLinux 8. We'll even make it start automatically when your server boots. Oh, and we'll sprinkle in some basic security tips to keep things safe.


Hey everyone!
There are quite a few guides out there on how to get OOKLA's Speedtest server on Linux, but honestly, even OOKLA's own guide is kinda vague. That's not fun, especially if you're somewhat new to Linux.
This guide is for the beginners out there. What you should know? How to install RockyLinux 8 (we're not covering that here), a bit about moving around the Linux command-line, and editing files using a text editor like nano or vi/vim.
Requirements:
For this walkthrough, all you need are an OOKLA account, properly configured DNS pointing at a server with RockyLinux 8 freshly installed. Use a minimal installation, without graphical user interface. Make sure the server has a network interface facing the public internet with at least one public IPv4 address assigned to it. Oh, and if you're on IPv6 (which you should be), slap on an IPv6 address too!
Deployment steps:
- Secure the superuser access.
- Set up a new system user specifically for the OOKLA Speedtest server.
- Configure the firewall correctly with firewalld, using iptables as the backend.
- Install the necessary systemd unit files for autostart on boot.
- Adjust the SELinux policy to let systemd start the speedtest server as an unprivileged user.
Alright, let's get started! First and foremost, if not done yet, make sure you have a secure, non-generic password set for the root user. After you've successfully installed your RockyLinux 8.
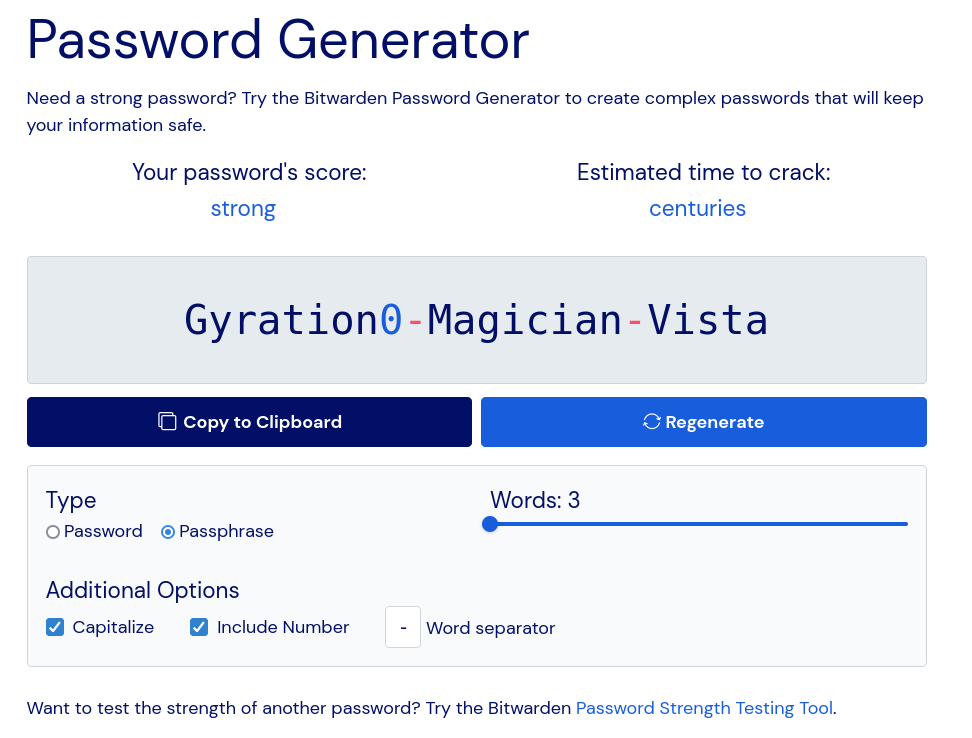
You can head over to the Strong Password Generator provided by Bitwarden, to generate a strong enough password.
Then, log in to your server using the root user:
ssh root@<ip address>Change the root password:
[root@AS12345-OOKLA1 ~]# passwd
Changing password for user root.
New password:
Retype new password:
passwd: all authentication tokens updated successfully.
Next, let's make sure all the latest software packages are installed:
[root@AS12345-OOKLA1 ~]# dnf update -yReboot the server:
[root@AS12345-OOKLA1 ~]# rebootThen, log back into your server:
ssh root@<ip address>Ensure the 'tar' and 'wget' packages are installed, they're hard dependencies for this to work!
[root@AS12345-OOKLA1 ooklaserver]# dnf install -y wget tarNow, before we proceed with installing the OOKLA speedtest server, let's get the firewall configuratiojn sorted out.
Firewall Configuration
Ensure firewalld is installed:
[root@AS12345-OOKLA1 ~]# dnf install -y firewalld
Last metadata expiration check: 0:55:27 ago on Sun 03 Sep 2023 12:02:18 PM UTC.
Package firewalld-0.9.3-13.el8.noarch is already installed.
Dependencies resolved.
Nothing to do.
Complete!Let's switch the backend of firewalld to iptables:
[root@AS12345-OOKLA1 ~]# sed -r -i -e "/(.*)FirewallBackend(.+)/c FirewallBackend\=iptables" /etc/firewalld/firewalld.confRestart the firewalld service, and then verify if iptables chains have been created:
[root@AS12345-OOKLA1 ~]# systemctl restart firewalld

[root@AS12345-OOKLA1 ~]# iptables -nvL IN_public_allow
Chain IN_public_allow (1 references)
 pkts bytes target     prot opt in     out     source               destination
    0     0 ACCEPT     tcp  --  *      *       0.0.0.0/0            0.0.0.0/0            tcp dpt:22 ctstate NEW,UNTRACKED
    0     0 ACCEPT     tcp  --  *      *       0.0.0.0/0            0.0.0.0/0            tcp dpt:9090 ctstate NEW,UNTRACKED
Great! In the output above, you'll notice that port 9090/tcp is permitted for inbound traffic. That's designated for the cockpit service, which provides a simple web interface for managing your server. If you opted for a minimal OS installation, cockpit wouldn't be included by default. Regardless, let's go ahead and close that port, and ensure that cockpit isn't installed.
[root@AS12345-OOKLA1 ~]# dnf remove -y cockpit
[root@AS12345-OOKLA1 ~]# firewall-cmd --remove-service=cockpit
[root@AS12345-OOKLA1 ~]# firewall-cmd --runtime-to-permanent
Verify that port 9090/tcp has been closed:
[root@AS12345-OOKLA1 ~]# iptables -nvL IN_public_allow
Chain IN_public_allow (1 references)
 pkts bytes target     prot opt in     out     source               destination
    0     0 ACCEPT     tcp  --  *      *       0.0.0.0/0            0.0.0.0/0            tcp dpt:22 ctstate NEW,UNTRACKED
Neat! Now, only SSH is permitted. Next, let's permit inbound connections from all sources to the ports that the speedtest server uses. Specifically, ports 80, 443, 5060, and 8080 for both UDP and TCP transport protocols.
[root@AS12345-OOKLA1 ~]# firewall-cmd --add-port=80/tcp --add-port=80/udp
[root@AS12345-OOKLA1 ~]# firewall-cmd --add-port=443/tcp --add-port=443/udp
[root@AS12345-OOKLA1 ~]# firewall-cmd --add-port=5060/tcp --add-port=5060/udp
[root@AS12345-OOKLA1 ~]# firewall-cmd --add-port=8080/tcp --add-port=8080/udp
[root@AS12345-OOKLA1 ~]# firewall-cmd --runtime-to-permanent
Make sure to verify:

Awesome, that seems to have worked! Based on the packet counter, we are also able to see that we've received one inbound connection on port 80.
If you want to limit SSH access on the default port 22/tcp, use the following commands. Remember to replace x.x.x.x with an IP address or a subnet in CIDR notation (e.g., 1.2.3.0/24).
[root@AS12345-OOKLA1 ~]# firewall-cmd --remove-service=ssh
[root@AS12345-OOKLA1 ~]# firewall-cmd --add-rich-rule='rule family="ipv4" source address="x.x.x.x" service name="ssh" accept'
Save the current runtime configuration as permanent:
[root@AS12345-OOKLA1 ~]# firewall-cmd --runtime-to-permanentDeploying the Speedtest Server
Now, create the system user dedicated to running the OOKLA speedtest server process:
[root@AS12345-OOKLA1 ~]# useradd ooklaserverSwitch to the ooklaserver user:
[root@AS12345-OOKLA1 ~]# su - ooklaserver
Download the OOKLA speedtest installer:
[ooklaserver@AS12345-OOKLA1 ~]$ wget https://install.speedtest.net/ooklaserver/ooklaserver.shMake the installer script executable:
[ooklaserver@AS12345-OOKLA1 ~]$ chmod u+x ooklaserver.shInstall the server binary:
[ooklaserver@AS12345-OOKLA1 ~]$ ./ooklaserver.sh install
Server Platform is linux64
This will install the Ookla server for linux64 to the current folder. Please confirm (y/n) > y

[...]
Starting OoklaServer
Daemon Started (1234)
Confirm with 'y', followed by enter.
The installer script tends to automatically start the OoklaServer daemon. We have to stop it before proceeding with the systemd configuration:
[ooklaserver@AS12345-OOKLA1 ~]$ ./ooklaserver.sh stop
Stopping OoklaServer Daemon (1234) . . . . . . . . . . . . . . . . . . . .
Additional OoklaServer processes running; stopping
[...]
Great, now let's switch back to the root user:
[ooklaserver@AS12345-OOKLA1 ~]$ exit
[root@AS12345-OOKLA1 ~]#
Let's set up the unit files for systemd. Just copy and paste the chunks below, starting from cat and concluding at EOF:
[root@AS12345-OOKLA1 ~]# cat << EOF > /etc/systemd/system/ooklaserver.socket
[Unit]
Description=Ookla Server socket

[Socket]
ListenStream=80
ListenStream=443
NoDelay=true
EOF
Set up the socket unit file. This enables the OoklaServer process to proxy privileged network ports 80 and 443, for the speedtest server process running as a non-privileged user.
[root@AS12345-OOKLA1 ~]# cat << EOF > /etc/systemd/system/ooklaserver.service
[Unit]
After=network.target
Requires=ooklaserver.socket

[Service]
User=ooklaserver
Group=ooklaserver

WorkingDirectory=/home/ooklaserver

Type=forking
KillMode=process

ExecStart=/home/ooklaserver/ooklaserver.sh start
ExecStop=/home/ooklaserver/ooklaserver.sh stop

TimeoutStartSec=30
TimeoutStopSec=10

Restart=on-failure

[Install]
WantedBy=multi-user.target
EOF
This service unit file which allows you to start, stop, and restart the OoklaServer process.
Reload the systemd daemon for changes to take effect:
[root@AS12345-OOKLA1 ~]# systemctl daemon-reloadLet's check whether the ooklaserver service is now present:
[root@AS12345-OOKLA1 ~]# systemctl status ooklaserver
● ooklaserver.service
   Loaded: loaded (/etc/systemd/system/ooklaserver.service; disabled; vendor preset: disabled)
   Active: inactive (dead)
Looking good! Let's try to fire it up :)
[root@AS12345-OOKLA1 ~]# systemctl start ooklaserver
Failed to start ooklaserver.service: Unit ooklaserver.service has a bad unit file setting.
See system logs and 'systemctl status ooklaserver.service' for details.
Whooops! Something ain't right. Let's check the system's audit.log and see whether we're having trouble with the SELinux policy:
[root@AS12345-OOKLA1 ~]# grep 'denied' /var/log/audit/audit.log | grep 'ooklaserver.sh' | tail -1
type=AVC msg=audit(1693744541.087:1431): avc:  denied  { execute } for  pid=7644 comm="(erver.sh)" name="ooklaserver.sh" dev="sda" ino=265528 scontext=system_u:system_r:init_t:s0 tcontext=unconfined_u:object_r:user_home_t:s0 tclass=file permissive=0
Fair enough! SELinux prevents systemd from executing files of type user_home_t! Luckily, there is an easy fix for that. First, let's install the policy core utilities and extend the local SELinux file context to change the label of the ooklaserver.sh script.
[root@AS12345-OOKLA1 ~]# dnf install -y policycoreutils policycoreutils-python-utilsNow, let's change the file type from user_home_t to initrc_exec_t so systemd can execute the script:
[root@AS12345-OOKLA1 ~]# semanage fcontext --add --type initrc_exec_t /home/ooklaserver/ooklaserver.shNow we'll just have to restore the security labels:
[root@AS12345-OOKLA1 ~]# restorecon -RFv /home/ooklaserver
Relabeled /home/ooklaserver/ooklaserver.sh from unconfined_u:object_r:user_home_t:s0 to system_u:object_r:initrc_exec_t:s0
Let's try to fire it up, again!
[root@AS12345-OOKLA1 ~]# systemctl start ooklaserver

[root@AS12345-OOKLA1 ~]# systemctl status ooklaserver
● ooklaserver.service
   Loaded: loaded (/etc/systemd/system/ooklaserver.service; enabled; vendor preset: disabled)
   Active: active (running) since Sun 2023-09-03 12:43:51 UTC; 2h 12min ago
  Process: 7706 ExecStart=/home/ooklaserver/ooklaserver.sh start (code=exited, status=0/SUCCESS)
[...]
BOOM! Let's check that the speedtest server processes are listening on all required ports:
[root@AS12345-OOKLA1 ~]# lsof -nPiTCP:80,443,8080,5060
COMMAND    PID        USER   FD   TYPE DEVICE SIZE/OFF NODE NAME
systemd      1        root   50u  IPv6  51435      0t0  TCP *:80 (LISTEN)
systemd      1        root   51u  IPv6  51436      0t0  TCP *:443 (LISTEN)
OoklaServ 7715 ooklaserver    3u  IPv6  51435      0t0  TCP *:80 (LISTEN)
OoklaServ 7715 ooklaserver    4u  IPv6  51436      0t0  TCP *:443 (LISTEN)
OoklaServ 7748 ooklaserver    4u  IPv4  51101      0t0  TCP *:5060 (LISTEN)
OoklaServ 7748 ooklaserver    6u  IPv4  51126      0t0  TCP *:8080 (LISTEN)
Indeed, they are!
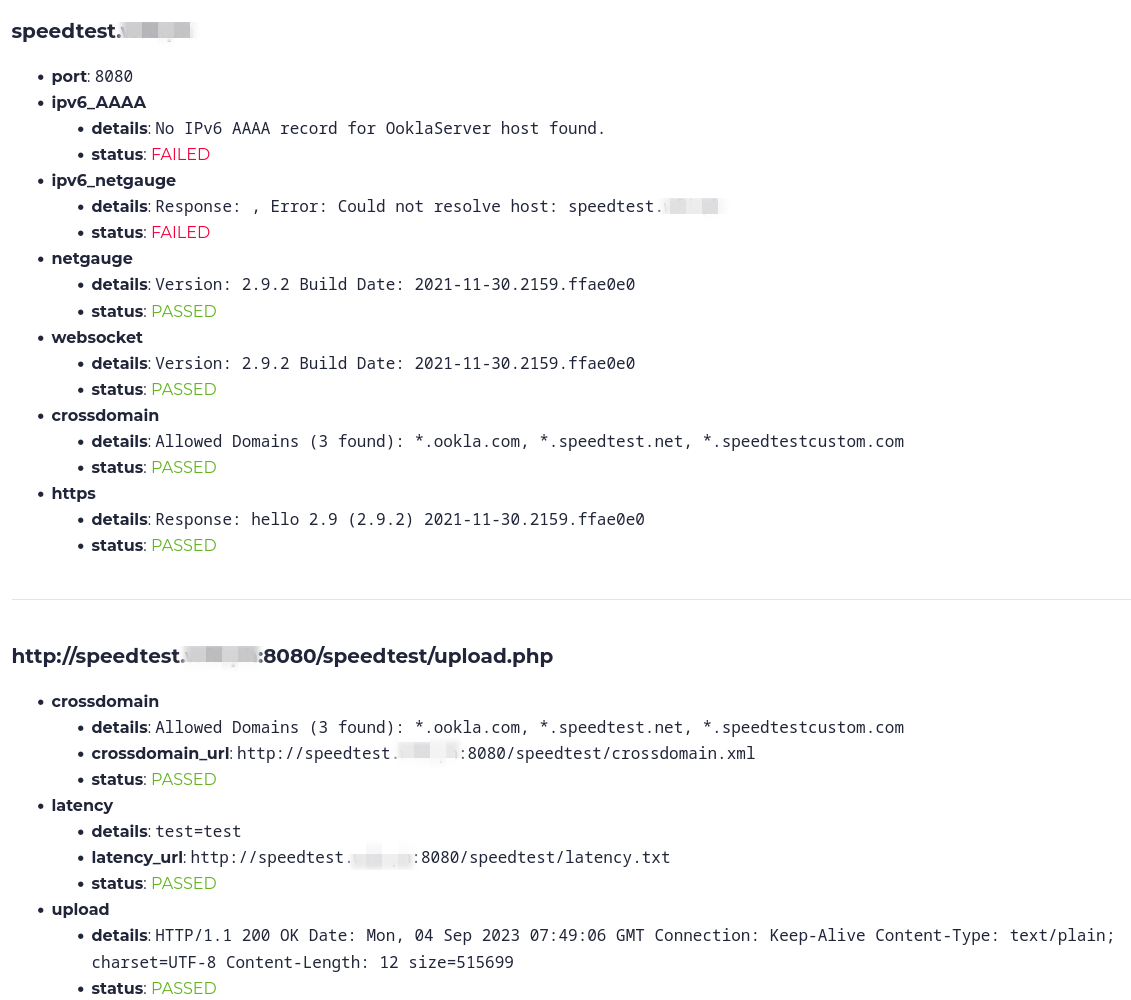
The last step is to test your server using the OOKLA server tester before requesting it to be listed publicly.
Here's a test for a server that lacks both IPv6 connectivity and the corresponding IPv6 DNS record: